Tuesday 28 January 2014

Toffee Nut Cheesecake


My challenge this week was to make an indulgent cheesecake but with fewer calories than the norm, I was really happy with the result and so were the rest of the cheesecake recipients! So here you have my Toffee Peanut Cheesecake.

P.S The info at the end of the recipe are the syn values for anyone following the Slimming World plan.


Makes 3 individual cheesecakes
For the base:
6 x Kellogg’s Nutrigrain Oats & Honey Breakfast biscuits
Pinch of cinnamon (optional)                
1 teaspoon melted Lurpack Lightest     

Crush the biscuits and add the cinnamon, mix in the melted butter and divide between 3 individual dishes, press down firmly, chill in fridge.

For the topping:
50g Chocolate Philadelphia
1 tablespoon crunchy peanut butter
1 sachet Options Toffee Hot Chocolate
½ tub Quark
1 Toffee Mullerlight Yoghurt
2 leaves gelatine
Vanilla Extract
Sweetener (optional)          
Sliced banana or fresh raspberries
Icing Sugar for dusting


Put the gelatine in a bowl of cold water and leave to soften
Mix together the chocolate Philadelphia and the peanut butter until well combined
Whisk in the Mullerlight yoghurt and vanilla, fold in the Quark, add sweetener to taste (optional)

Squeeze the water from the softened gelatine, put into a small saucepan with small amount of water, heat gently until dissolved

Add the gelatine to the cheesecake mixture and mix well.

Pour the mixture equally onto the biscuit bases and put in fridge to set for 4-6hours.


Top with fresh raspberries and dust with icing sugar

Enjoy!


SW Info
Total Syns per recipe 15 & 3 HEB
Per portion 5syns & 1 HEB 

Monday 20 January 2014

Skinny Sunday Sundae


Raspberry & Banana Skinny Sunday Sundae


Well, 2014 and already nearly the end of January, where does the time go? 
January is that time of year when we are all trying to be ‘good’, so here’s a tasty but almost saintly little treat I made last Sunday and another yesterday so it only seems right to call it a Skinny Sunday Sundae....
It only take a few minutes and a few ingredients and is super versatile,

0% fat Greek Yoghurt or Quark if you can find it.
Fat Free flavoured yoghurt
Low Calorie Hot Chocolate sachet  e.g Options
Sugar free jelly (make your own or buy it ready made)
Fresh fruit of your choice
Mini marshmallows, mini meringues(crushed) and a chopped up cereal bar.


In a tall glass layer up fat free Greek yoghurt mixed with a fat free flavoured yoghurt, sugar free jelly, fresh fruit, fat free Greek yoghurt mixed with the hot chocolate sachet, crushed mini meringues, a chopped up cereal bar and some mini marshmallows.
Delicious!

Chocolate & Orange Skinny Sunday Sundae (excuse the terrible lighting)

Monday 2 December 2013

Never Fail Biscotti - My Christmas gift to you....

Never Fail Biscotti


Christmas Spice with cranberry, orange, cinnamon, nutmeg and chocolate


So, this is my Christmas gift to you all, my biscotti recipe, it truly is a never fail recipe and is so versatile & delicious. It's also dairy free.

The word biscotti originates from medieval Latin and translates as twice baked, which is exactly what this is, a twice baked, hard, crunchy biscuit. Perfect for dunking in your coffee after a meal or in your hot chocolate!

It's also an excellent gift as it last so well, you can make it way in advance, pop it in a bag (ensuring it's airtight) tie it with a bow and Ta-Dah! Instant pressie!

It’s highly versatile flavour wise, and the sky is the limit with flavour combinations. You'll see a few of my favourite flavours scattered through this post....

So, go on.....Bake It!!!!


Cinnamon Sugar, half dunked in milk chocolate


Ingredients
· 250g plain flour
· 250g caster sugar
· 1 ½ tsp baking powder
· 3 eggs
· Up to 375g of filling of your choice, nuts, choc chips, dried fruit, spices etc, chop the dried fruit quite finely.
· Zest 1 lemon (optional depending on your filling ingredients)
· Caster sugar for sprinkling

Cashew & Chocolate

Method
Whisk eggs and sugar together till a little frothy

Add flour & baking powder & mix, finally add nuts etc and stir until combined.

Now, it is a very wet mix but trust me here, line 2 trays with parchment and lay 2 thick sausages of mixture on both trays – the easiest way to do it is to scoop the mixture from the bowl with wet hands.....

Sprinkle with caster sugar.

Bake at 180c for 25-30 mins till golden brown.

Remove from oven, slice into 1-1.5cms slices, lay the slices on their sides and put back in oven for 10-12min.

Remove from the oven, and trnasfer to a cooling rack, the biscotti will harden up as it cools.

The biscotti will keep well in an airtight container/tin/box/bag for up to 4 weeks, fruit ones slightly shorter.

 Enjoy!


Pistachio, cashew, cherry


Sunday 1 December 2013

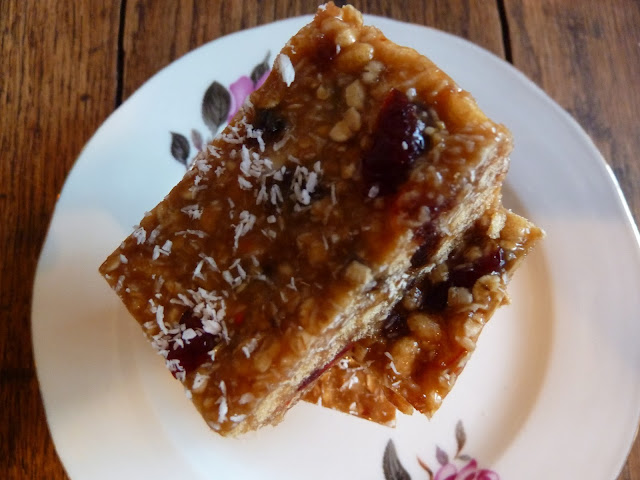
Chewy Coconut Peanut Butter Slices


If you were to ask me my favourite flavours up there in the top 5 would be coconut & peanut butter, so as you can imagine I LOVE this recipe!
These are delicious, chewy, nutty moreish slices of delight! And believe me, if you are a peanut fan like me, you’ll love them!

The original recipe came from the book ‘Simple Slices’ by the Australian Woman’s Weekly which I picked up at the airport on the way home from holiday in Gozo. I adapted it slightly to use up the ingredients in my cupboard.

Oh, and the best thing about this recipe? No baking and it keeps for up a week......
Chewy Coconut Peanut Butter Slices

Ingredients

·         60g butter, chopped

·         90g honey

·         110g light brown soft sugar

·         95g smooth peanut butter

·         2 tablespoons marmalade (whatever flavour you like, I used pomegranate as that was all I had in the cupboard - also from my hols in Gozo!)

·         90g rolled oats

·         50g Rice Crispies

·         35g desiccated coconut (plus extra for sprinkling)

·         75g dried fruit (I used cranberries but any dried fruit will be fine)

·         55g finely chopped glace cherries or pineapple.


Method

·         Line a 23cm square tin with baking parchment

·         Combine the butter, honey, sugar, peanut butter & marmalade in a large saucepan and heat gently till the sugar has dissolved (don’t boil).

·         Once the sugar has melted bring to a boil for 30 seconds or so and remove from heat.

·         Stir in all the remaining ingredients and mix well.

·         Pour into your lined tin and press down firmly till smooth and even.

·         Sprinkle with the remaining desiccated coconut.

·         Refrigerate till firm, slice, serve, enjoy!!!

·         Will keep for at least a week in an airtight container kept in the fridge. Serve at room temperature.

Saturday 28 September 2013

The Best Drizzle Cake EVER!!


The Best Ever Drizzle Cake

This has got to be the best drizzle cake EVER! I came across the recipe a while ago at the Really Nice Recipes website and it has never failed me.

The best thing about it, it gets better with age so you can make it well in advance and just forget about it.

I’ve made several versions of it so far and they’ve all been fabulous...

The classic Lemon Drizzle – always a winner

The St Clements Drizzle using the juice & zest of 1 orange, lemon & 1 lime

The Grapefruit Drizzle using the zest & juice of 1 ½ grapefruits lovely and sharp

And finally The Tropical Drizzle, using the zest & juice of 3 limes, a healthy glug of coconut liqueur and a substituting 50g flour or 50g desiccated coconut

The trick to it is to feed the cake with as much syrup as possible and then leave it for a couple of days to infuse/soak up properly.

Its lovely served as a loaf cake which i've done for Afternoon Tea.....
....or can be split and decorated to make something a little grander, I made one for a friend’s birthday with a layer of lemon curd in the middle and covered with fresh cream and a bit more lemon curd.......

.....I also made one for a baby shower covered with fondant and filled with a lemon marscapone cream. All of which were scrumptious!


Anyway, this is one recipe you will not want to lose so put it in your recipe books NOW!!!

Here is the classic Lemon version recipe (taken from www.reallynicerecipes.com )

Ingredients
  • 100g unsalted butter
  • 250g caster sugar
  • 3 large eggs
  • 100ml milk
  • 250g self-raising flour
  • pinch of salt
  • 1 teaspoon baking powder
  • zest of 3 lemons
  • For the drizzle:
  • Juice of 3 lemons
  • 100ml water
  • 170g caster sugar

  1. Heat oven to 180°c.
  2. Put the eggs, milk and sugar into a large mixing bowl.
  3. Thoroughly whisk them together until the mixture becomes well mixed and foamy
  4. Sift in the flour, salt and baking powder and then stir it into the liquid mixture until there are no lumps left.
  5. Stir in the lemon zest. Then heat the butter (either on the hob or in the microwave) until it has completely melted, then pour it in to the batter and stir until it is completely incorporated.
  6. Pour the mixture into a greased loaf tin, lined with greaseproof paper.
  7. Put the tin into the oven and bake it for 50 minutes.
  8. To test if the cake is done, insert a skewer into the middle and if it comes out clean the cake is ready. When it is cooked, remove it from the oven and leave it in its tin.
  9. To make the drizzle, squeeze the lemon juice through a sieve into a heat-proof pouring jug.
  10. Put the water and sugar into a pan over a medium heat. Bring the mixture up to the boil and boil it for 4 minutes.
  11. Pour the sugar mixture into the jug with the lemon juice and mix them together.
  12. Pour as much of the lemon drizzle mixture onto the cake as you can and leave the cake to absorb for 20 minutes. If the cake becomes reluctant to absorb any more liquid, stop pouring.
  13. Carefully remove the cake from the tin (there may be some of the drizzle left, unabsorbed in the bottom of the tin), transfer it to a wire rack and allow it to completely cool to room temperature
  14. When the cake is cold, slice it and serve.

Enjoy!

Sunday 8 September 2013

Orange & Chocolate Mousse Cake


Orange & Chocolate Mousse Cake

This dessert is rich, creamy, light & fluffy all at the same time and sits on a crispy chocolatey base what more could you ask for?!.. delicious!

Firstly – put 5 small sheets of gelatine into a bowl of cold water to soften.

For the base whizz up the following in a food processor -10 digestive biscuits, 25g Demerara sugar and a handful of choc chips.

Then add 50g melted butter, 1 sachet of instant chocolate drink – e.g. Options and mix well.

Press into the bottom of a parchment lined spring form tin, just line the bottom, not the sides.

Put in fridge to chill.

Next, mix together, 200g full fat cream cheese, 230ml double cream, 1 tin condensed milk. Then gradually add the zest & juice of 2 oranges, juice of 1 lemon & 2-3tbs orange water/extract to taste.

Then give the whole lot a blooming good whisk until thickened and fluffy.

Drain the gelatine and put into a saucepan with a small amount of water and gently heat until dissolved.

Whisk into the creamy mousse mixture and then pour onto your chilled base.

Set in the fridge for a few hours.

Decorate however you fancy, I went for fresh cream and chocolate orange decorations (can you spot my mistake in the picture?)

To serve run a warm palette knife around the edge of the tin and then release the spring!

Enjoy!

p.s Keep refrigerated


Monday 19 August 2013

Cherry Conserve


I was lucky enough recently to visit a local cherry farm, it was fascinating and inspiring to see such wonders growing on your doorstep, cherries straight from the tree are quite simply out of this world. They were kind enough to send me away with some free ‘samples’, however, there are only so many fresh cherries you can eat so to use up the ‘leftovers’ I made a nice healthy batch of cherry conserve, I’ve labelled it as quick, which it is once you’ve pitted all your cherries – this is rather time consuming, but with some good music in the background the time will whizz by!


Quick Cherry Conserve

1kg pitted and halved fresh cherries

500g jam sugar

1 x cinnamon stick

100ml water

Glug of kirsch or cherry brandy or brandy or some form of booze!!

Put cherries, water & cinnamon in saucepan and simmer till softened, about 15-20mins.

Add sugar & booze, simmer until softly set – to check, drop a little onto a cold plate and give it a little nudge with your finger, if it wrinkles it’s done!

Spoon into clean, dry jars. Keep in fridge once opened.

Enjoy!
Great for pie filling, tart topping, frangipane bases, ice cream topping, Eaton mess making...you get the picture!! I used some of mine in a franginpane tart with more cherries, raspberries & blackcurrants which was rather lovely!